


(Updated article with some improved functionality.)
So this is my second article on Hashnode. It's the team over at scrimba.com's fault for making me do it. 😂
I'm excited and nervous to be writing this but I believe for each article you write, it will get easier and its a really good way to help solidify what you've learned.
So I thought I'd do just that and give you guys a little tutorial of my solution for the weekly challenge set by Scrimba.com.
I'm going to take you step by step of how I made a currency converter, sooooo.....
Let’s get Started
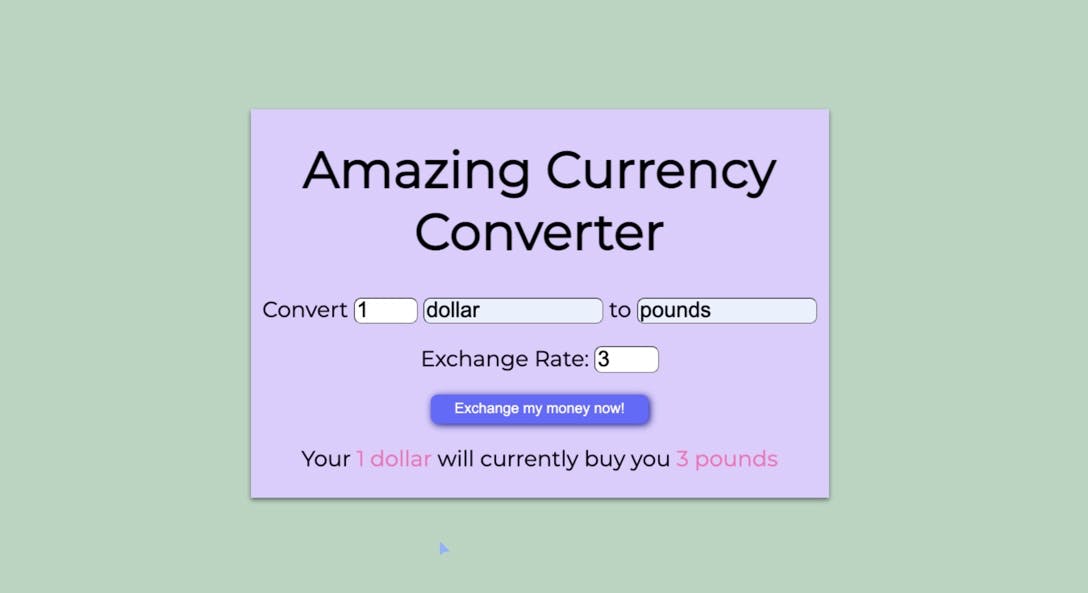
The challenge was set to build a currency converter that would display 4 input fields and a button, an amount field, original currency field, new currency field and exchange rate field.
By clicking a button, the converted amount would be displayed underneath the button as per the mock up image below.
Doing the Research
There are so many resources of information out there and so to start with, I googled some online currency convertors for inspiration.
Google and yahoo, amongst others both have good examples of currency convertors.
From this research I decided to improve the overall solution and remove the button which seemed like an unnecessary step in the process, which I am about to show you.
Building a Structure
I always try to look at the structure before moving onto the styling with CSS, followed by the Javascript code.
First lets look at the HTML that was provided by the guys over at scrimba:
<html>
    <head>
        <link rel="stylesheet" href="index.css">
    </head>
    <body>

    <h1>Amazing Currency Converter</h1>
    <p>
        Convert
        <input type="number" id="original-currency-amount" placeholder="1"></input>
        <input type="text" id="original-currency-unit" placeholder="original currency"></input>
   to
        <input type="text" id="new-currency-unit" placeholder="new currency"></input>
    </p>
    <p>
        Exchange Rate:
        <input type="number" id="exchange-rate"></input>
    </p>
    <button>Exchange my money now!</button>
    <p id="output-text">
        Converted 💰 will appear here.
    </p>

    <script src="index.pack.js"></script>
    </body>
</html>
As you can see we have a simple HTML layout with a h1 heading and the input fields and button I mentioned earlier.
I decided to add a h3 element to display the exchange rate text, remove the button and change the currency-unit input fields into drop down fields, so there is little room for error when entering currency codes.
As a side note I could have also added the dropdown using javascript new Option() but on this occasion I decided to add it directly to the HTML.
<html>

<head>
  <link rel="stylesheet" href="index.css">
</head>

<body>
  <div class="main">
  <div class="outerContainer">
    <h1>International Currency Converter</h1>
    <h3 class="exchangeRateText"></h3>

    <div class="innerContainer">

      <input type="number" id="original-currency-amount" placeholder="1" min="1" oninput="validity.valid||(value='')"></input>

      <select name="origCurr" id="original-currency-unit">
          <option value="EURO">🇪🇺EURO</option>
        <option value="GBP">🇬🇧GBP</option>
        <option value="NZD">🇳🇿NZD</option>
      </select>

      <input type="text" id="exchange-rate" readonly></input>

      <select name="newCurr" id="new-currency-unit">
        <option value="NZD">🇳🇿NZD</option>
        <option value="GBP">🇬🇧GBP</option>
        <option value="EURO">🇪🇺EURO</option>
      </select>

    </div>

    <p id="output-text">
    </p>

  </div>
  </div>

  <script src="index.pack.js"></script>
</body>

</html>
So now we have the structure of our project, let's move onto the styling.
Style the App
Styling the app is the fun part and there are lots of cool effects that you can implement, I suggest having a play around with CSS gradients.
There are also some helpful tools that can help you generate the perfect gradient, but this is one of my favourites as it also contains some excellent technical articles and info cssgradient.io .
Getting back to the app, the main thing I needed to achieve was to apply a responsive design to the currency convertor.
/* @import url("https://fonts.googleapis.com/css2?family=Roboto:wght@500&display=swap"); */
@import url("https://fonts.googleapis.com/css2?family=Poppins:wght@500&display=swap");
html,
body {
  margin: 0;
  padding: 0;
}

body {
  text-align: center;
  background-image: url("https://assets.codepen.io/3383494/money.jpg");
  background-repeat: no-repeat;
  background-size: cover;
  font-family: "Poppins", sans-serif;
  color: whitesmoke;
}

.main {
  height: 100vh;
  display: grid;
  justify-content: center;
  align-items: center;
  background-image: linear-gradient(315deg, #323232 0%, #09203f 74%);
  opacity: 0.9;
}

.outerContainer {
  display: grid;
  justify-content: center;
  align-items: center;
  background: rgb(51, 174, 222, 0.1);
  width: 300px;
  min-width: 40vw;
  border-radius: 10px;
  box-shadow: 2px 2px 10px 500px #09203f;
  border: 1px solid rgb(51, 174, 222, 1);
}
.innerContainer {
  display: grid;
  grid-template-columns: repeat(2, 100px);
  justify-content: center;
  align-items: center;
  grid-gap: 10px;
}

input {
  display: flex;
  padding: 10px;
  text-align: center;
  border: #0b4287;
  border-radius: 10px;
  border: 1px solid #dbe1e5;
}
select {
  background-color: #283a52;
  color: white;
  padding: 10px;
  border-radius: 10px;
  border: 1px solid #dbe1e5;
  cursor: pointer;
}
#original-currency-amount {
  cursor: pointer;
}

select:focus,input:focus {
  outline: none;
}
I could have used CSS Flex-box, but I have become particularly fond of CSS Grid .
Grid is a much more powerful 2 dimensional layout in comparison to Flex-box and it was perfect for achieving the responsiveness I needed through 3 div containers:
- main
- outerContainer
- InnerContainer
The 'main' container has a height of 100vh(view height) which fills up the view point. This means the outerContainer can be aligned central to the main container so in the center of the screen.
.main {
  height: 100vh;
  display: grid;
  justify-content: center;
  align-items: center;
  background-image: linear-gradient(315deg, #323232 0%, #09203f 74%);
  opacity: 0.9;
}

.outerContainer {
  display: grid;
  justify-content: center;
  align-items: center;
  background: rgb(51, 174, 222, 0.1);
  width: 300px;
  min-width: 40vw;
  border-radius: 10px;
  box-shadow: 2px 2px 10px 500px #09203f;
  border: 1px solid rgb(51, 174, 222, 1);
}
.innerContainer {
  display: grid;
  grid-template-columns: repeat(2, 100px);
  justify-content: center;
  align-items: center;
  grid-gap: 10px;
}
I set the containers to display:grid and the inner container set to repeat 2 columns of 100px in the center of the parent outerContainer.
Set out the code
Usually the first thing I would do is take all of the elements I need from the DOM and set these out at the top of the JS file.
eg. "let element =document.querySelector("element name")"
However a nice little trick I picked up is to create a function with a parameter 'ele' representing the DOM element.
The function returns document.querySelector(ele).
All you need to do is call the function with the DOM element as an argument.
Note: if you use this approach then ensure your HTML class names or ids are descriptive enough so that you know what the code is doing.
const $$ = (ele) => document.querySelector(ele);
 $$("element-name").innerHTML = "hello" // or whatever else you want to do here
The next step was to decide how to get hold of the currency rates.
There are many ways to achieve this and I could have used a ternary operator, if statements, switch statements.
However I found the cleanest and simplest way to achieve this was to create a lookup table using an object containing the exchange rates.
I could also have achieved the same result by fetching from an API and accessed it in a similar way.
const rates = {
  GBPGBP: 1.0,
  EUROEURO: 1.0,
  NZDNZD: 1.0,
  GBPEURO: 1.1215,
  GBPUSD: 1.3644,
  GBPNZD: 1.8988,
  NZDGBP: 0.53,
  NZDUSD: 0.72,
  NZDEURO: 0.59,
  EUROGBP: 0.89,
  EURONZD: 1.68,
  EUROUSD: 1.21,
};
I wanted the exchange rate and drop down fields to be populated at the outset so I created a 'convertor' function which is called by 2 'change' event listeners for both drop downs, along with a call method set globally.
I also needed to set the value of the exchange rate field by concatenating the original and new currency-unit dropdown fields on 'change' so that they formed a matching key eg "GBPEURO".
Once formed, the matching key could then be used to access the 'rates' object and return the corresponding value. This could then be applied to the exchange rate field as a value.
The second part of the function combines the matching key and template literals with embedded original and new currency unit values into a h1 element, updating it each time the dropdown fields are changed.
Each time the drop down fields are changed it triggers an event that updates the banner text to show the correct exchange rate text.
const convertor = () => {
returnRate = $$("#original-currency-unit").value.concat($$("#new-currency-unit").value);
  exchangeRate=rates[returnRate]
  $$(".exchangeRateText").innerHTML = ` Exchange Rate: 1 ${
    $$("#original-currency-unit").value
  } =  ${exchangeRate|| ""} ${$$("#new-currency-unit").value}`;

};
$$("#original-currency-unit").addEventListener("change", convertor);
$$("#new-currency-unit").addEventListener("change", convertor);
A second function was created called 'calculateAmount' which calls the convertor function in order to recycle variables, uses an 'input' event listener for the amount field and a ternary operator to add some logic. The logic determines if the original amount has not been entered then set the value to no value, else if an amount has been 'input', then calculate the converted amount into the exchange field.
A further 2 'change' event listeners are set to capture the switching over of drop down fields which would in turn recalculate the amount.
const calculateAmount = () => {
convertor()
  $$("#exchange-rate").value=exchangeRate
 $$("#original-currency-amount").value === ""
    ? $$("#original-currency-amount").value =""// set to no value
    : $$("#exchange-rate").value =Number($$("#original-currency-amount").value * exchangeRate.toFixed(2))//else if amount is not null, output message not displayed and currency amount is converted into new currency
}
$$("#original-currency-amount").addEventListener("input", calculateAmount);
$$("#original-currency-unit").addEventListener("change", calculateAmount);
$$("#new-currency-unit").addEventListener("change", calculateAmount);
So that's it...
I hope if you're reading, you draw some inspiration to build your own apps. The key to succeeding with Javascript is to keep building.
Check out the full code on scrimba here or checkout my codepen.